QNAP Storage Pool Adjustment / iSCSI Connections

Don’t do a me and not schedule a maintenance window when adjusting/removing storage pools on a QNAP NAS when you have active iSCSI connections.

I had a TS-1273U-RP with 2 storage pools configured, one with a block-based thick LUN and another with just folder shares. Deleting the second folder shares pool caused the thing to drop the iSCSI connection from a Hyper-V host to the first pool and wouldn’t reconnect until it was restarted.

Make sure you schedule a window and be prepared to lose the iSCSI connections until you reboot after removing the pool(s).

All fun on a Friday…

HPE ProLiant DL360 Gen10 SPP USB Boot

TLDR: Make sure the USB drive is USB 2.0 and under 32GB and the HP USB Key Utility must be used.

Had a bit of a game with this today, server not updated since 2017 so with a couple of versions of iLO to upgrade through thought it would be easier to put the SPP on a USB drive.

Downloaded the ISO (which took forever to find, thanks HP) and imaged with Rufus which didn’t work. Then found the HP USB Key Utility and tried another 2 USB 3.0 drives which also didn’t work. The server recognised the drive but when trying to boot it wasn’t having it.

One 32GB USB 2.0 drive later and it’s finally booted.

Error: “Cannot find vSphere HA master agent” After vCenter 8.0 Update 3e

After patching our vCenter this afternoon from 8.0 Update 3d to 3e I encountered the following errors:

Cannot find vSphere HA master agent

vSphere HA agent for this host has an error: The vSphere HA agent is not reachable from vCenter Server

Broadcom has a fairly helpful guide which basically involves turn HA off and back on again.

However it doesn’t mention to wait at least 5 minutes after switching HA off. The first time I did the switch off and back on it didn’t fix the issue but after switching off, waiting 5 and then switching back on the hosts remediated and elected themselves correctly.

VMware vSphere Standard Available Again

Dropping some real world experience in ordering this for Google searches.

This was announced back in October 2024 but these SKUs are definitely available via resellers as I’ve ordered in December.

Word of warning, quotes take forever to get. I had a chat with Broadcom at the Dell Technology Forum in November and that seemed to get the process moving but it was weeks between asking our reseller and getting the price back.

Your reseller may vary but everything is priced on the dollar so ours wouldn’t provide a quote for any longer than a year.

Removing duplicate VDA entries in Citrix Director

We run a Citrix Virtual Apps and Desktops 7 stack at work and have had an interesting one where Citrix Director has shown one of our multi-session OS machines has been duplicated. Studio shows just one entry of the machine but Director shows two; one legitimate one and another with the IP showing as n/a

Some research later1 and it seems the only way to resolve this is to do some database digging to remove the duplicate entry. Citrix do have an article2 saying removing the offending machine from the catalog and re-adding it works but it didn’t for me.

Ensure you have backed up/snapped an image of wherever your database is hosted before continuing!

Run the following SQL query to find the duplicate (replace MonitorDB with your monitoring database name and machinename with the machine name of the duplicate)

> Select * From [MonitorDB].[MonitorData].[Machine] WHERE Name Like ‘%machinename%’

This should return both the genuine machine and the duplicate – it should be obvious which is which, in our case the duplicate had an IP address of NULL. Copy the machine ID and use the following query to delete (again, replace MonitorDB and machine ID with yours)

> DELETE FROM [MonitorDB].[MonitorData].[Machine] WHERE ID = ‘Old Machine Id’

I then restarted the Citrix Monitoring service, not sure if this step is absolutely necessary as I didn’t check Director before and after the service restart.

1: https://support.citrix.com/article/CTX285009/director-is-showing-duplicate-sessions

2: https://support.citrix.com/article/CTX286784/duplicate-entries-for-vdas-showing-up-in-director

AlmaLinux 8.6 + Plesk: Updating MariaDB 10.3 to 10.5

Quick guide on how to update MariaDB 10.3 to 10.5 when using AlmaLinux 8.6 with Plesk Obsidian. This is using a clean install of Plesk Obsidian 18.0.46 and is correct at time of publishing.

Stop MariaDB service

service mariadb stop

Remove incompatible gssapi package

dnf remove mariadb-gssapi-server

Edit/create mariadb.repo in /etc/yum.repos.d/ with the following (I use nano but any editor will do)

nano /etc/yum.repos.d/mariadb.repo

[mariadb]
name = MariaDB
baseurl = http://yum.mariadb.org/10.5/rhel8-amd64
module_hotfixes=1
gpgkey=https://yum.mariadb.org/RPM-GPG-KEY-MariaDB
gpgcheck=1

Ctrl + X to save and quit, Y then enter.

Clean cache and install MariaDB

dnf clean all

dnf install MariaDB-server galera-4 MariaDB-client MariaDB-shared MariaDB-backup MariaDB-common

Restart MariaDB

systemctl restart mariadb

Upgrade databases

MYSQL_PWD=cat /etc/psa/.psa.shadow mysql_upgrade -uadmin

Restart MariaDB again

systemctl restart mariadb

Update Plesk MariaDB version

plesk sbin packagemng -sdf

Restore SELinux on /var/lib/mysql/*

restorecon -v /var/lib/mysql/*

You should now have MariaDB 10.5 installed and working replacing 10.3.

Using File Screening with Teams Installer

At the school I am currently working at we use File Screening in the user data areas to prevent download and storage of executables and crypto files. Over the last week as staff and students have returned this has caused some issues when it comes to Teams and how it updates itself.

Our usual method of software deployment is via Group Policy software installation. As Teams installs in each user’s AppData we deploy the Teams machine wide MSI. Most of the time Teams then silently updates without issue however occasionally it prompts the user to download the full Teams installer .exe in order to update.

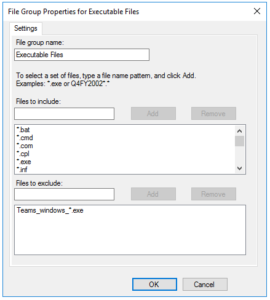
This creates issues as we block all .exe files in the screen template. However there is a simple solution, you are able to create an exception within the template.

Open up File Server Resource Manager -> File Screen Templates -> Edit Template Properties. Select Executable Files and then Edit. Under Files to exclude add

Teams_windows_*.exe

The asterisk means if the user ends up with multiple installers (Teams_windows_x64 (1).exe for example) due to switching machines etc. it won’t get blocked.

Related to this one of our team has written a great article for our help desk on how the end users can update Teams.

20H2 Network Rebuild

As you’ll know if you follow my work Twitter I spent last week over at Trinity Catholic School who have recently joined the MAC rebuilding their network from a legacy RM CC4 image to a new Lourdes IT 20H2 one.

This included some great work by Dan our project lead on creating new virtual machines and some interesting technical challenges running the two networks side by side when it came to DNS and DHCP. We needed to do this due to the fact that until we got to a point where all IT rooms were imaged the children that were in school still needed access to computers to be able to complete their online learning.

The image was deployed via MDT containing 20H2 and Office 365 and then other software is picked up using the software installation Group Policy. All machines are installed with senso remote monitoring software and this makes it really easy to test an entire IT suites functionality using the log on/log off tools that are in the senso console.

Once we got going it was pretty smooth sailing and there has been a good speed improvement on their machines. Unfortunately they are a little bit dated and ideally it would have been great to upgrade some with SSDs but perhaps that’s another job for another day.

Few pics of the rebuilt machines are below.

MagicPods: AirPods App for Windows

I’m half in, half out of the Apple ecosystem owning an iPhone, Apple Watch and AirPods but using a Windows PC. For a while I’ve had my AirPods connected via Bluetooth to the PC but with no real way to manage them other than the Bluetooth settings pane.

Battery info and settings screen

All that changed the other day when I discovered a great little app on the Microsoft Store for the small sum of £1.69.

MagicPods brings the functionality you expect from connecting your AirPods to a Mac to Windows including battery indicator, automatic connection, volume reducing when removing them from your ears and much more besides.

Pop up as you get on an iOS device when you open the case

It introduces a great little pop up when you open the AirPods case showing you battery life and includes a battery status indicator in the taskbar.

There is a free 24 hour trial available so you can try it out and see if it works for you before purchasing.

If you are like me and enjoy using the AirPods with your Windows machine then this app is definitely worth investing in.

Available from the Microsoft Store